Godot 4 3D crash course: build a third-person game
Build the game's scenes, knight controller, orbit camera, animations, crystal counter and opening gate. Written steps and complete code for the free video course.
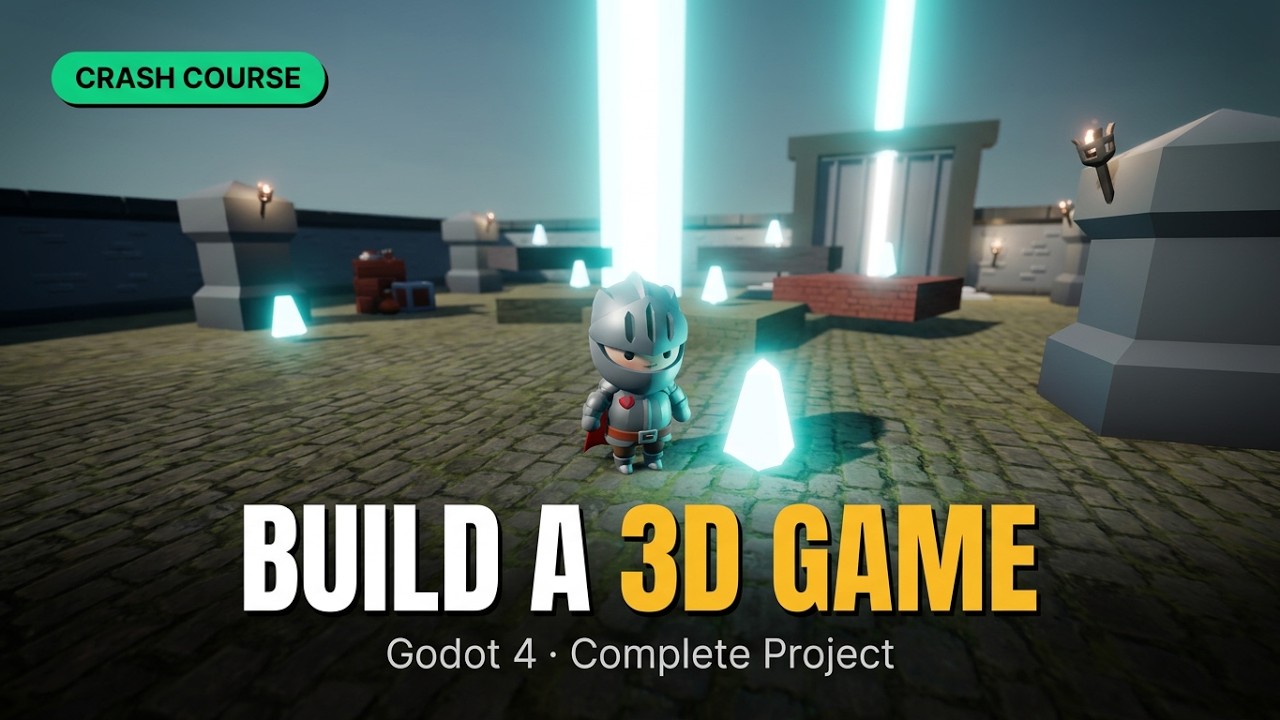 Godot 4 3D Crash Course: Build a Third-Person Game
Build a small third-person game: move a knight around a courtyard, jump between platforms, collect five crystals and open the gate. This is the written companion to the complete 2:40:01 video above. All teaching and code on this page are free. You do not need a plugin, a paid asset or another course.
Get the assets: free starter and camera sample. The optional complete checkpoint ZIPs are in the supporter posts linked in the video description. They save setup time; they are not needed to follow these instructions.
Version: the recorded chapter-end projects declare Godot 4.8. Their code was checked with 4.8.beta3.mono.official.c51ff06e8; it is ordinary GDScript and does not use C#. The older free samples were prepared for Godot 4.7.2. They are reference projects, not identical copies of every recorded checkpoint. Use a separate folder for each project so upgrading a sample does not overwrite it.
Before you start
You should be comfortable selecting nodes, saving scenes and changing Inspector properties. A scene is a saved tree of nodes. The Inspector edits the selected node. GDScript supplies behavior that those nodes do not have on their own.
- Create a 3D project, choose Forward+, and create a
Node3Droot namedMain. Save it asres://scenes/main.tscn. - Extract the free starter outside this project. Copy its four CC0 pack folders
into your project's
assets/folder:kaykit_adventurers,kaykit_dungeon,ambientcg_pavingandkenney_audio. The older sample keeps these underaddons/; this guide uses the recorded project'sassets/paths instead. Keep each pack's license file beside its files. Let Godot finish importing. - Create
scenes/andmaterials/. In this recording the scripts also live inscenes/. Use the exact filenames below so scene references remain clear. - Press F5, choose the current scene as the main scene, then stop the project.
An empty run is expected. Every later test uses F5 from
main.tscn.
The free camera sample is useful for looking around a working project. Start with the empty scene above to build the recorded version step by step.
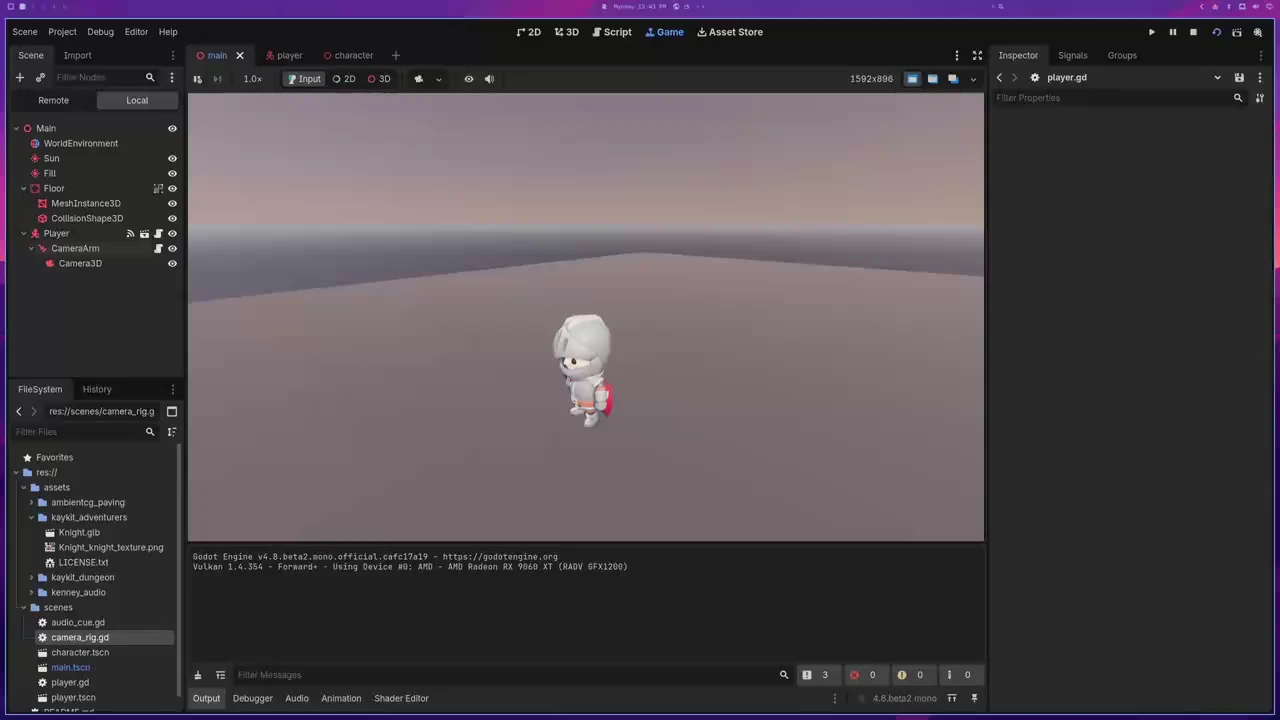
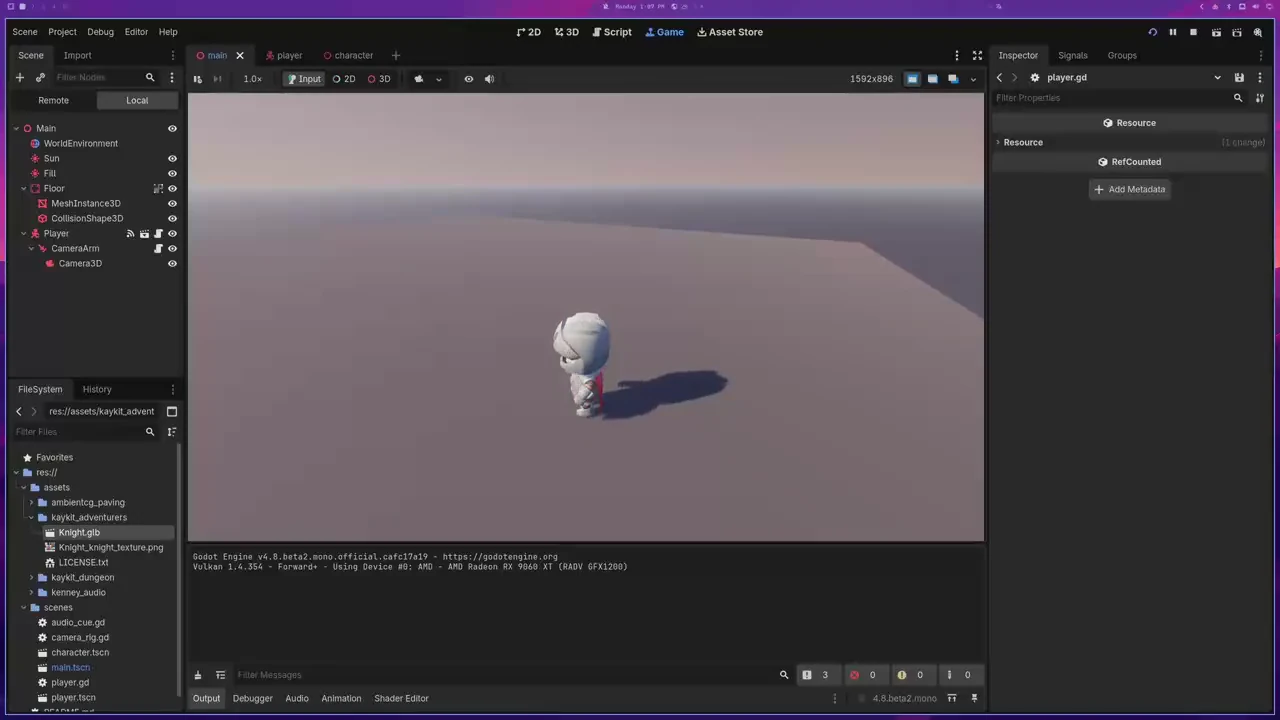
Use the screenshots below to compare your scene at each checkpoint. Select an image to open it full size, or follow its timestamp to see that step in the video.
Find your chapter
- 1. Your first 3D scene — video 0:13
- 2. Character physics — video 17:07
- 3. Third-person camera — video 1:04:57
- 4. Animation tree — video 1:14:46
- 5. Level blockout and dressing — video 1:22:35
- 6. Collectibles and HUD — video 1:51:23
- 7. The gate, export and next steps — video 2:16:45
The opening of each video chapter shows where you are going. Build from the previous chapter's result, not from that preview. Save and run before moving on.
1. Your first 3D scene
Start with the empty main.tscn. This chapter creates a lit world, floor and
fixed camera. It has no character or script yet.
Give the world a sky
Add a WorldEnvironment under Main. In Environment, create a new
Environment resource. Set Background → Mode to Sky, create a Sky,
then give it a ProceduralSkyMaterial. Use a dark blue sky top and a warmer,
paler horizon for the dusk look.
Set these Environment properties:
| Property | Value |
|---|---|
| Ambient Light → Source | Color |
| Ambient Light → Energy | 0.7 |
| Tonemap → Mode | ACES |
| Tonemap → White | 6.0 |
| Glow → Enabled | On |
| Glow → Intensity | 0.55 |
| Glow → Bloom | 0.1 |
| Volumetric Fog → Density | 0.009 |
| Volumetric Fog → Length | 80.0 |
Choose a cool ambient color. Add a DirectionalLight3D named Sun; rotate it
down toward the floor, set Light → Energy to 1.8, choose a warm color and
enable shadows. Add a second directional light named Fill, facing from the
other side, with a cool color, energy 0.45 and specular 0.0. The fill keeps
the knight readable without flattening the sun's shadows.
If volumetric fog or glow is unavailable, check the renderer. Forward+ is the renderer used for this scene. Do not judge collision or movement from fog alone.
Make a floor the player can stand on
Under Main, create this tree:
Floor (StaticBody3D)
├── MeshInstance3D
└── CollisionShape3D
Give the mesh a BoxMesh sized (40, 1, 40). Give the collision node a
BoxShape3D with the same size. Leave the floor at the origin. Its top is at
Y 0.5 because the box is centered on its origin. Add a dark gray
StandardMaterial3D to the mesh's surface material override.
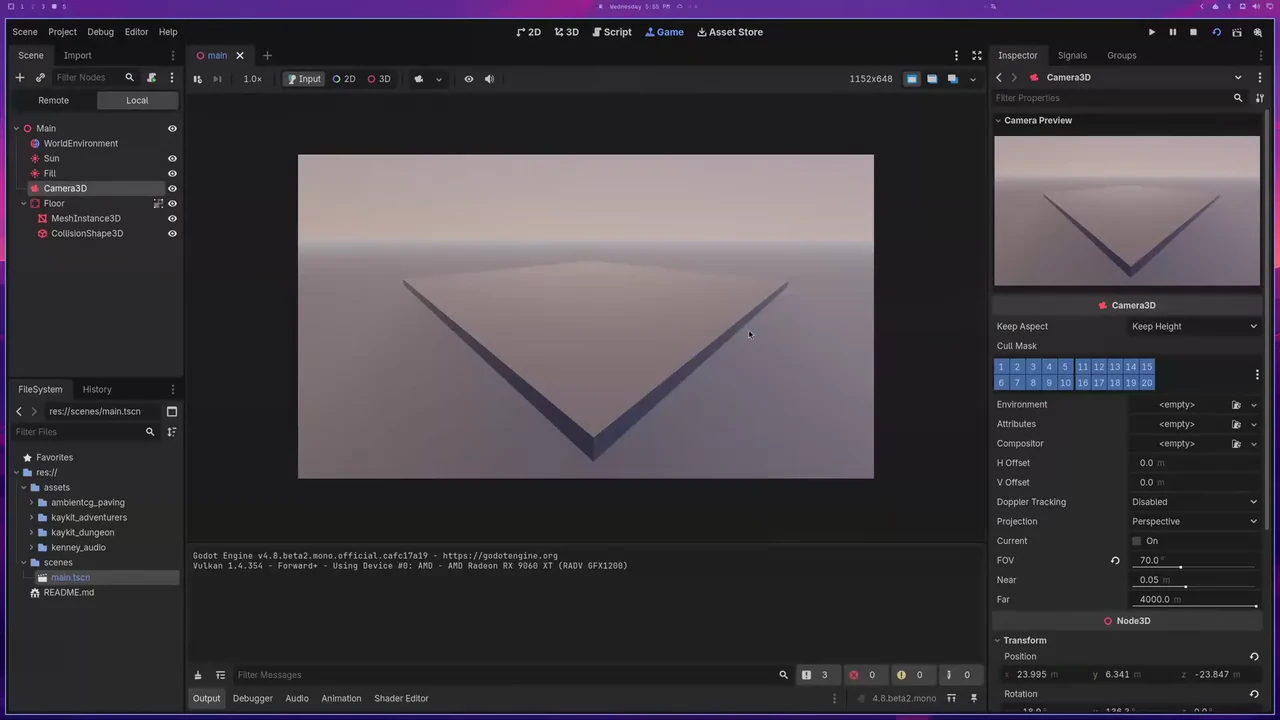
Add a Camera3D under Main. Move it above the ground, aim it at the middle
of the floor and enable Current. Use the editor's camera preview to confirm
that the floor is visible. This is a temporary camera; chapter 3 replaces it.
Check: F5 shows the floor, sky and lighting. A mesh draws the floor; its separate shape supplies collision. If the screen is empty, check the current camera and the main scene before changing lighting values.
2. Character physics
Start from the lit floor. Create the inputs and scene children before attaching the movement script.
Name the actions
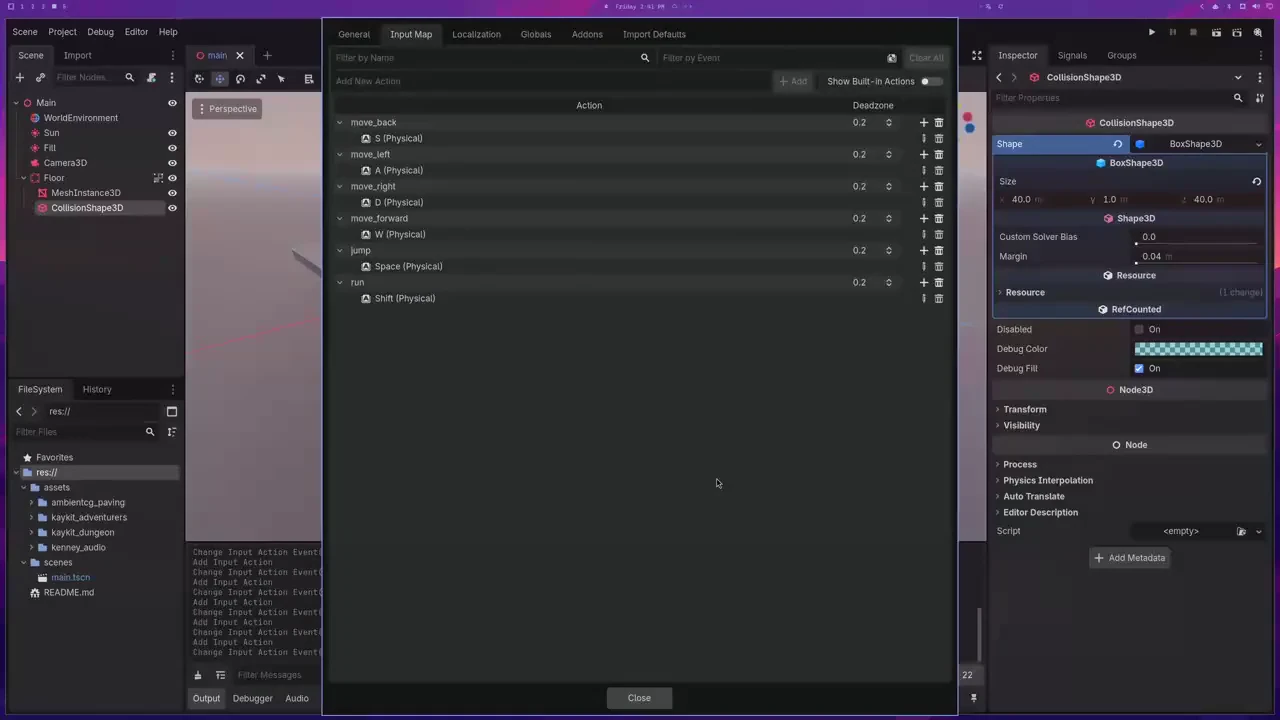
Open Project → Project Settings → Input Map. Add these actions and bind physical keys. If you opened a starter containing them, verify the names rather than creating duplicates.
| Action | Key |
|---|---|
move_forward |
W |
move_back |
S |
move_left |
A |
move_right |
D |
jump |
Space |
run |
Shift |
The script asks for action names, not keyboard letters. An action named
forward does not satisfy a lookup for move_forward.
Build the player and visual scene
Create a new CharacterBody3D scene named Player. Save it as
res://scenes/player.tscn. Add CollisionShape3D, choose CapsuleShape3D,
set radius 0.4, height 1.8 and move the shape to Y 0.9. This puts the
player root at its feet. Add a child Node3D named Visual.
Create another scene with a Node3D root named Character. Instance
assets/kaykit_adventurers/Knight.glb below it as Knight. Save
res://scenes/character.tscn. Use Editable Children on the Knight instance
to inspect its skeleton, meshes and AnimationPlayer. Hide the weapons you
do not want. Keeping or hiding the cape is a visual choice, not movement code.
For a breathing idle, open the GLB's Advanced Import Settings, select
Idle, set Loop Mode to Linear, and reimport. Select its
AnimationPlayer in the character scene and enable autoplay for Idle.
Autoplay chooses what starts; loop mode determines whether it repeats.
Instance character.tscn under the player's Visual as Character. Leave
its position at the origin, set rotation Y to 180 degrees and uniform scale
to 0.75. The model's feet and the player root should meet. This is the
recorded feet-origin layout; do not also move the character down 0.9.
Put sound on the sound nodes
Under Player add JumpSound and LandSound, both AudioStreamPlayer3D.
Assign assets/kenney_audio/jump.ogg and land.ogg, set volume to -10 dB
and max distance to 14. Attach res://scenes/audio_cue.gd to both players:
extends AudioStreamPlayer3D
## One-shot cue owned by the sound node. Restarting this player keeps a repeated
## event from stacking voices on top of the previous one.

func play_cue() -> void:
	stop()
	play()
The helper restarts its own sound. The player will announce a jump or landing without knowing which audio node handles it.
Add movement, then connect its signals
Attach res://scenes/player.gd to Player. Paste this chapter-2 version:
extends CharacterBody3D
## Third-person player. Movement announces what happened; the sound nodes listen.

signal jumped
signal landed

@export var walk_speed: float = 3.0
@export var run_speed: float = 6.5           # run speed
@export var acceleration: float = 28.0
@export var deceleration: float = 22.0
@export var jump_velocity: float = 8.0
@export var gravity: float = 34.0
@export var fall_multiplier: float = 1.6
@export var turn_speed: float = 14.0

@onready var visual: Node3D = $Visual

var _was_on_floor : bool = true

func _physics_process(delta: float) -> void:
	if not is_on_floor():
		# Falling is faster than rising, so the jump does not hang in the air.
		var g := gravity * (fall_multiplier if velocity.y < 0.0 else 1.0)
		velocity.y -= g * delta

	if Input.is_action_just_pressed("jump") and is_on_floor():
		velocity.y = jump_velocity
		jumped.emit()

	var input : Vector2 = Input.get_vector("move_left", "move_right", "move_forward", "move_back")
	var direction := (transform.basis * Vector3(input.x, 0.0, input.y)).normalized()

	# Two speeds on one key, so the blend space has a middle to sit on.
	var target_speed := run_speed if Input.is_action_pressed("run") else walk_speed
	var target := direction * target_speed
	var rate := acceleration if direction else deceleration
	velocity.x = move_toward(velocity.x, target.x, rate * delta)
	velocity.z = move_toward(velocity.z, target.z, rate * delta)

	if direction:
		var target_yaw := atan2(-direction.x, -direction.z)
		visual.rotation.y = lerp_angle(visual.rotation.y, target_yaw, clampf(turn_speed * delta, 0.0, 1.0))

	move_and_slide()

	if is_on_floor() and not _was_on_floor:
		landed.emit()

	_was_on_floor = is_on_floor()
Now the two signals exist. In the Node → Signals panel, connect Player's
jumped to JumpSound.play_cue and landed to LandSound.play_cue. Choose
the existing method names rather than creating unrelated generated handlers.
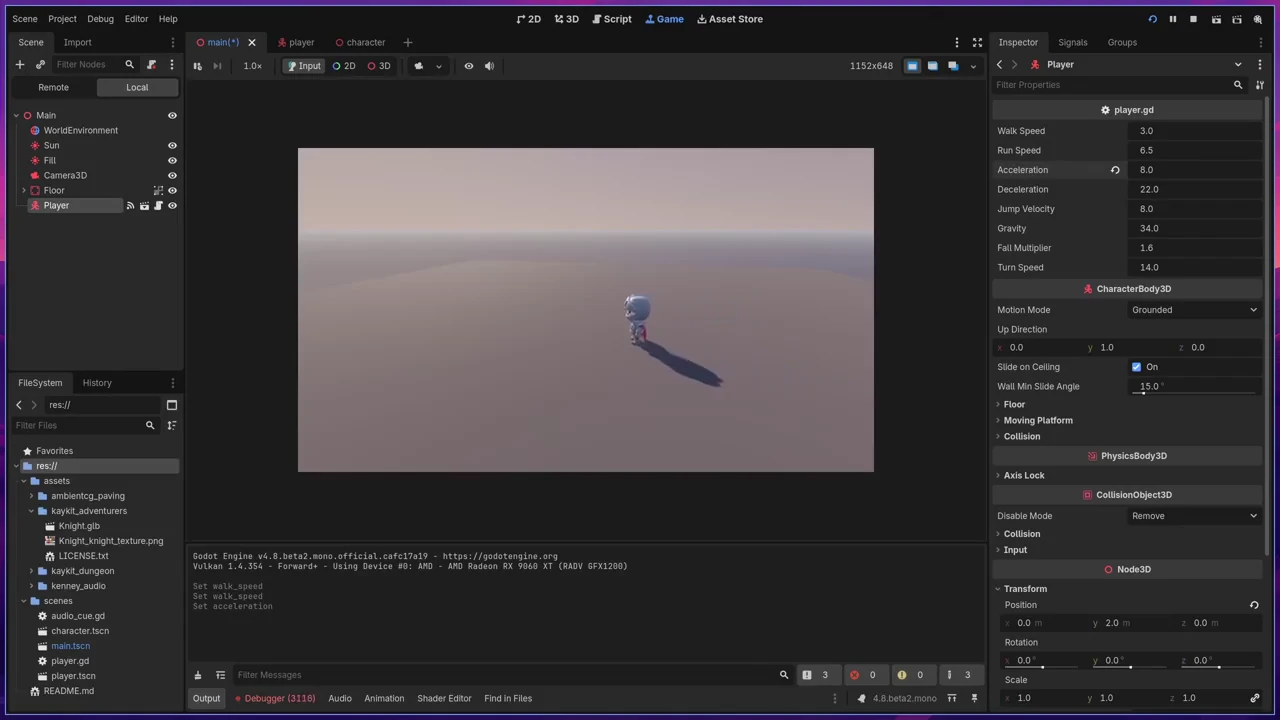
Instance player.tscn in Main as Player, at position (0, 2, 13).
Run the main scene. The body falls onto the floor, moves with WASD, runs with
Shift and jumps with Space. Its visual turns toward the direction of travel.
move_toward uses a rate multiplied by delta, so acceleration and braking
are measured over time. Horizontal movement uses two speeds. The knight still
slides in an idle pose while moving; chapter 4 supplies the locomotion blend.
Check: release the keys and watch the body slow down. Jump and land more than once. Verify both audio connections. If the body falls through the floor, check its shape and the floor shape before changing the movement code.
3. Third-person camera
Start with the moving player. Open Main and add SpringArm3D under its
Player instance, named CameraArm. These camera children are added on the
instance in Main in the recording; the Player script will see them when Main
runs. Do not run player.tscn alone for this test.
Set CameraArm position to (0, 1.8, 0), rotation X to -20 degrees,
Spring Length to 4.5 and Margin to 0.1. Add a Camera3D child,
leave its local position at zero and enable Current. Remove or disable
the old fixed camera.
Attach res://scenes/camera_rig.gd to CameraArm:
extends SpringArm3D
## Third-person camera. Yaw from the mouse, pitch clamped so the camera never
## rolls over the character and never drops the feet out of frame. The arm casts
## backwards and pulls in when it hits something solid — which is why chapter 5
## gives the courtyard walls collision. Stop the project to get the cursor back.

@export var mouse_sensitivity: float = 0.0025
@export var min_pitch_degrees: float = -60.0
@export var max_pitch_degrees: float = 5.0

func _ready() -> void:
	Input.mouse_mode = Input.MOUSE_MODE_CAPTURED

func _unhandled_input(event: InputEvent) -> void:
	if event is InputEventMouseMotion:
		rotation.y -= event.relative.x * mouse_sensitivity
		rotation.x = clampf(
			rotation.x - event.relative.y * mouse_sensitivity,
			deg_to_rad(min_pitch_degrees),
			deg_to_rad(max_pitch_degrees)
		)
The mouse rotates the arm. Pitch is clamped so it cannot flip over the player. The spring arm can pull the camera toward the player when its shape hits collision. Decorative wall meshes alone do not provide that collision.
The movement direction must now follow the camera. In player.gd, add this
below the Visual reference:
@onready var camera_arm: SpringArm3D = $CameraArmReplace the old direction assignment with these lines, keeping them indented
inside _physics_process:
	var direction := camera_arm.global_basis * Vector3(input.x, 0.0, input.y)
	direction.y = 0.0
	direction = direction.normalized()
Removing Y makes the camera's pitch affect looking, not movement up into the air. Normalizing gives the direction a consistent length. Keep the rest of the chapter-2 movement script. The full combined player file appears in chapter 4.
Check: F5, rotate the camera, then press W. The player should move in the camera's horizontal forward direction. Stop the project from the editor to release the captured mouse. The recorded camera script does not implement the older free sample's Escape/click recapture controls.
4. Animation tree
Start from the camera-relative controller. Open player.tscn, add an
AnimationTree named AnimationTree, and assign these paths relative to it:
| Field | Value |
|---|---|
| Anim Player | ../Visual/Character/Knight/AnimationPlayer |
| Root Node | ../Visual/Character/Knight |
| Active | On |
| Tree Root | New AnimationNodeBlendSpace1D |
Enable Editable Children where needed so the node picker can reach the imported
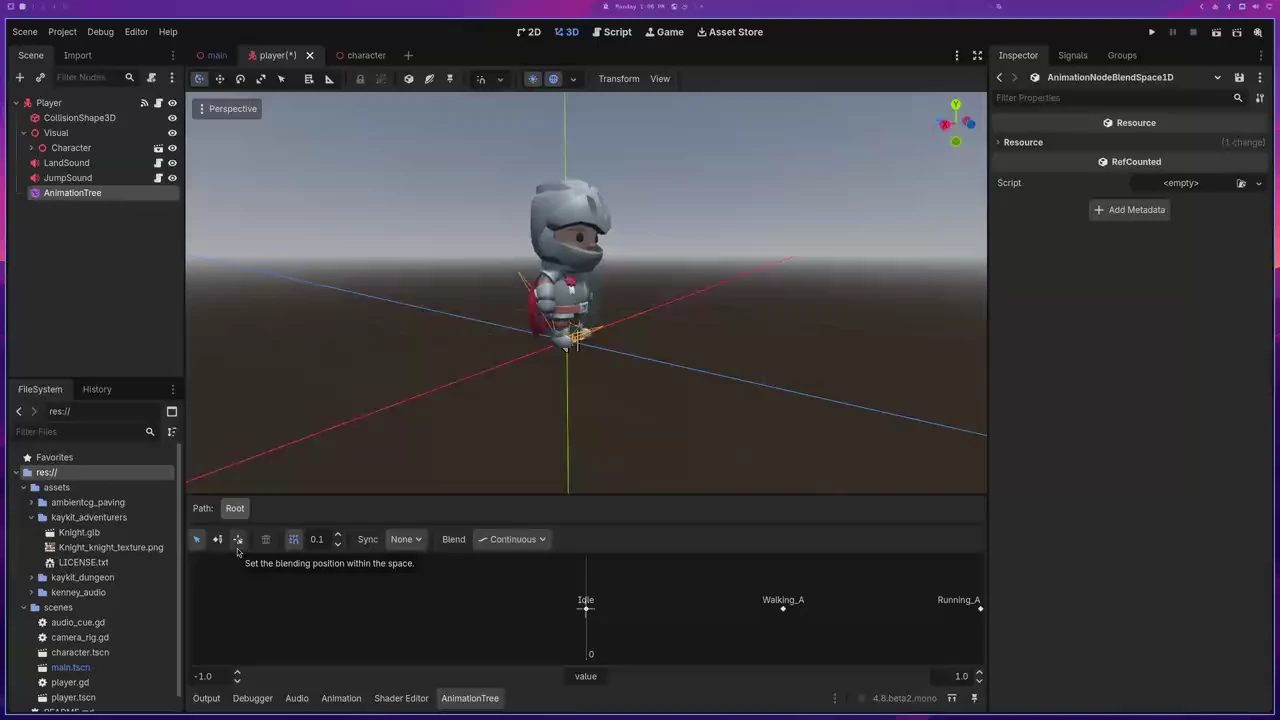
AnimationPlayer. In the bottom AnimationTree panel, add three animation points:
Idle at 0.0, Walking_A at 0.5 and Running_A at 1.0.
Preview the blend by dragging the blend position. Before adding code, verify
that all three clips loop. Set Walking_A and Running_A to Linear in
Advanced Import Settings and reimport, just as you did for Idle. Clear Idle's
standalone autoplay when the AnimationTree takes over.
Replace scenes/player.gd with the complete recorded controller below. This
includes chapter 3's camera-relative direction and the new speed reader:
extends CharacterBody3D
## Third-person player. Movement announces what happened; the sound nodes listen.

signal jumped
signal landed

@export var walk_speed: float = 3.0
@export var run_speed: float = 6.5           # run speed
@export var acceleration: float = 28.0
@export var deceleration: float = 22.0
@export var jump_velocity: float = 8.0
@export var gravity: float = 34.0
@export var fall_multiplier: float = 1.6
@export var turn_speed: float = 14.0

@onready var visual: Node3D = $Visual
@onready var camera_arm: SpringArm3D = $CameraArm
@onready var animation_tree := get_node_or_null("AnimationTree") as AnimationTree

var _was_on_floor : bool = true

func _physics_process(delta: float) -> void:
	if not is_on_floor():
		# Falling is faster than rising, so the jump does not hang in the air.
		var g := gravity * (fall_multiplier if velocity.y < 0.0 else 1.0)
		velocity.y -= g * delta

	if Input.is_action_just_pressed("jump") and is_on_floor():
		velocity.y = jump_velocity
		jumped.emit()

	var input : Vector2 = Input.get_vector("move_left", "move_right", "move_forward", "move_back")

	# Face the camera's forward when pressing forward instead of where the players current visual forward
	var direction := camera_arm.global_basis * Vector3(input.x, 0.0, input.y)
	direction.y = 0.0
	direction = direction.normalized()

	# Two speeds on one key, so the blend space has a middle to sit on.
	var target_speed := run_speed if Input.is_action_pressed("run") else walk_speed
	var target := direction * target_speed
	var rate := acceleration if direction else deceleration
	velocity.x = move_toward(velocity.x, target.x, rate * delta)
	velocity.z = move_toward(velocity.z, target.z, rate * delta)

	if direction:
		var target_yaw := atan2(-direction.x, -direction.z)
		visual.rotation.y = lerp_angle(visual.rotation.y, target_yaw, clampf(turn_speed * delta, 0.0, 1.0))

	move_and_slide()

	if animation_tree:
		var speed_ratio := Vector2(velocity.x, velocity.z).length() / run_speed
		animation_tree.set("parameters/blend_position", clampf(speed_ratio, 0.0, 1.0))

	if is_on_floor() and not _was_on_floor:
		landed.emit()

	_was_on_floor = is_on_floor()
The blend reads actual horizontal velocity. A slow stop therefore slows the
legs too. With the defaults, walking is 3.0 / 6.5 of the run speed, close
to the middle point; Shift reaches the run end. The optional tree lookup in
this recorded file lets the earlier non-animation state exist, but your
chapter-4 scene must have the named tree for the blend to work.
Check: stand still, walk, run and release the keys. The blend position should move through those speeds. Watch longer than one animation cycle. If the legs move once and then freeze, fix the imported loop mode rather than adding another movement branch.
5. Level blockout and dressing
The controller is working. Build a separate Node3D scene named Level and
save res://scenes/level.tscn. This keeps the stage geometry separate from
the reusable player. The goal is a courtyard with three jump platforms and
a visible gate. Decorative placement can vary without changing the lesson.
Ground and platforms
Add these CSGBox3D children. Turn Use Collision on for each one. Sizes
are mesh sizes; positions are the node transforms.
| Node | Size | Position |
|---|---|---|
Ground |
(40, 1, 40) |
(0, -0.5, 0) |
Step1 |
(4, 1, 4) |
(0, 0.2, -6) |
Step2 |
(4, 1, 4) |
(3, 0.9, -10) |
Step3 |
(5, 1, 5) |
(-2, 1.6, -14) |
OuterGround |
(220, 0.8, 220) |
(0, -0.6, 0) |
Create a StandardMaterial3D saved as materials/mat_ground.tres. Assign
assets/ambientcg_paving/paving_color.jpg as the albedo texture. Enable the
normal map with paving_normal.jpg, and use paving_roughness.jpg for
roughness. Apply the material to the ground. Reuse it, or make local variants,
for the steps. Adjust UV1 scale in the Inspector so stones repeat rather than
stretching across the entire courtyard.
The final recording uses an Inspector override of 8.0 for Acceleration on
the Player instance in Main. Set that if you want its slower speed ramp; the
script's default is 28.0. Keep walk and run speeds at 3.0 and 6.5.
Instance Level under Main. Remove the earlier temporary Floor from Main,
so two competing floor surfaces do not occupy the same space. This floor's
top is Y zero; Player stays at (0, 2, 13) and falls onto it.
Walls and reusable props
Add a Node3D named Props to Level. Create small wrapper scenes around the
pack's wall.glb, column.glb, torch_lit.glb and crate mesh, then instance
those wrappers under Props. The recording's wrappers are full_wall.tscn,
column.tscn, torch.tscn and crates.tscn.
For a wall, use a StaticBody3D root, put the visible imported wall below it,
and add a CollisionShape3D matching the solid wall. You can repeat mesh
instances below the same body. Keep their positions local to that wrapper.
Build the courtyard's sides, but leave an opening for the gate. Check collision
shapes in the running game; a beautiful wall without a shape is still empty
to physics and to the spring arm.
For a torch, keep the mesh and a warm OmniLight3D together in its scene.
Duplicate that scene instead of recreating its light settings in code. Put
columns and crates where they frame the route without hiding the jump landings.
The core movement test does not depend on copying every decorative object.
Block out the gate
At the far end of Level, create the gate posts, lintel and threshold below.
Turn Use Collision on. Put a temporary CSGBox3D gate between the posts;
chapter 7 turns it into a reusable animated scene.
| Node | Size | Position |
|---|---|---|
GatePostL |
(1.1, 7, 1.4) |
(-3.6627152, 3.5, -19.1) |
GatePostR |
(1.1, 7, 1.4) |
(3.4975476, 3.5, -19.1) |
Lintel |
(8.9, 0.9, 1.4) |
(0, 7.1, -19.1) |
Temporary Gate |
(6.4, 6.4, 0.5) |
(0, 3.2, -19.35) |
Threshold |
(7.6, 0.18, 1.6) |
(0, 0.09, -18.1) |
ThresholdLow |
(8.8, 0.08, 0.9) |
(0, 0.04, -17.2) |
Give the posts a stone material and the gate a dark iron material. Keep their surfaces distinct from the cool ground. Extra bands, a rune and torch lights are authored geometry and materials, not scripts.
Check: walk the route, jump onto all three steps and look around near a wall. Verify that collision matches the visible floor and walls. Leave enough space between the posts for the player capsule when the gate later lowers.
6. Collectibles and HUD
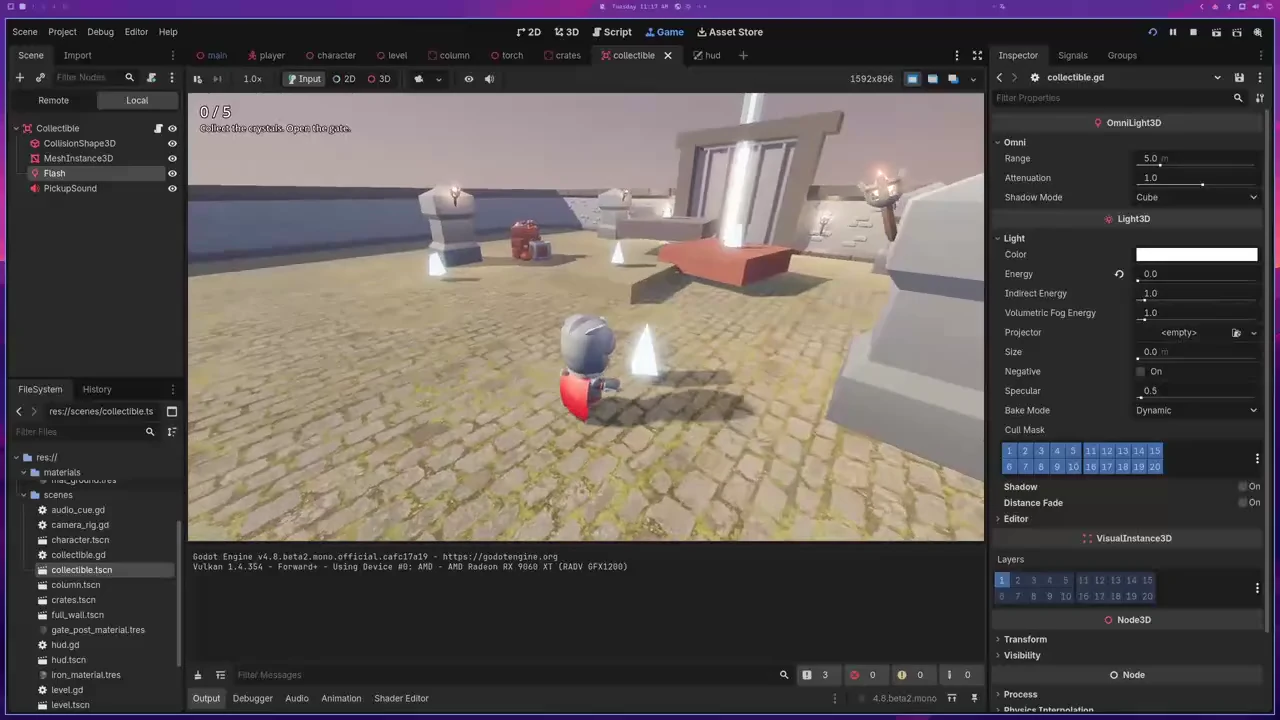
Start from the playable courtyard. A pickup announces collection; the level owns the count; the HUD displays the committed count.
Make the collectible scene
Create an Area3D scene named Collectible, saved as
res://scenes/collectible.tscn. Add these children before attaching its script:
Collectible (Area3D)
├── CollisionShape3D  — SphereShape3D
├── MeshInstance3D    — PrismMesh, size (0.5, 0.9, 0.5)
├── Flash             — OmniLight3D, initial light energy 0
└── PickupSound       — AudioStreamPlayer3D, assets/kenney_audio/pickup.ogg
Use a light cyan material with emission on the prism. The flash is a separate
light for the moment of pickup. Keep Area3D monitoring enabled and make its
collision mask include the player's body layer. Attach scenes/collectible.gd:
class_name Collectible
extends Area3D
## A crystal. It knows nothing about the level or the HUD — it only says
## "someone took me" and disappears with a flash and a sound.

@export_range(0.0, 1.0) var bob_height: float = 0.18
@export_range(0.0, 10.0) var spin_speed: float = 1.6
@export_range(0.0, 10.0) var bob_speed: float = 2.4

@onready var mesh: MeshInstance3D = $MeshInstance3D
@onready var flash: OmniLight3D = $Flash
@onready var sound: AudioStreamPlayer3D = $PickupSound

var _base_y := 0.0

signal collected

func _ready() -> void:
	body_entered.connect(_on_body_entered)
	_base_y = position.y

func _process(delta: float) -> void:
	# A still crystal reads as a placeholder; a spinning, bobbing one reads as a pickup.
	rotation.y += spin_speed * delta
	position.y = _base_y + sin(Time.get_ticks_msec() / 1000.0 * bob_speed) * bob_height

func _on_body_entered(body: Node3D) -> void:
	if body is CharacterBody3D:
		# Deferred: flipping monitoring inside its own signal errors.
		set_deferred("monitoring", false)
		collected.emit()
		sound.play()

		# A pickup should end on an event, not just vanish: pop, flash, gone.
		var pop := create_tween().set_parallel()
		pop.tween_property(mesh, "scale", Vector3(1.7, 1.7, 1.7), 0.12)
		pop.tween_property(flash, "light_energy", 7.0, 0.05)
		pop.tween_property(flash, "light_energy", 0.0, 0.3).set_delay(0.08)

		# The pickup sound is 0.29 s: outlive it, or the free cuts the tail.
		await get_tree().create_timer(0.35).timeout
		queue_free()
The area is disabled with a deferred change because the callback runs during
physics overlap handling. The crystal stays alive long enough for its sound
tail before freeing itself. Its declared collected signal contains no HUD
or level reference.
Instance five collectibles as direct children of Level. This matters: the level code below counts its direct children. These are the recorded positions; the three elevated crystals sit above the steps.
| Crystal | Position |
|---|---|
| First ground crystal | (-5.7737656, 0.7922921, -0.77812815) |
| Second ground crystal | (5.111515, 0.7922921, -0.77812815) |
| Step 1 crystal | (0.09637022, 1.4041297, -6.1310987) |
| Step 2 crystal | (3.383122, 1.9943168, -9.856347) |
| Step 3 crystal | (-2.2611961, 2.7180216, -13.968203) |
Let the level own the count
Attach res://scenes/level.gd to Level:
extends Node3D
## The level counts its direct-child collectibles and announces progress.

signal crystal_collected(collected: int, goal: int)

var total_crystals: int = 5
var collected := 0

func _ready() -> void:
	# Show the count from the start, so changing total_crystals changes the HUD.
	call_deferred("_emit_initial")

	# A designer who drops another crystal into the scene should not have to
	# remember this number: say so instead of never winning.
	var placed := 0

	for child in get_children():
		if child is Collectible:
			placed += 1
			child.collected.connect(_on_collectible_collected)

	total_crystals = placed

func _emit_initial() -> void:
	crystal_collected.emit(0, total_crystals)

func _on_collectible_collected() -> void:
	collected += 1
	crystal_collected.emit(collected, total_crystals)
The script connects each collectible's signal and derives the total from the
placed instances. In the recorded version, you do not type 5 into an exported
Inspector field: the placed crystals are the source of that total. Duplicating
a direct-child collectible increases the goal automatically.
Build the count HUD
Create a CanvasLayer scene called HUD, saved as scenes/hud.tscn.
Add a Label called Crystals, positioned at (24, 16), with font size
30 and an outline so it stays readable against the world. Add another Label
called Goal as a child of Crystals, below it, font size 18, text
Collect the crystals. Open the gate.
Attach res://scenes/hud.gd using this chapter-6 version:
extends CanvasLayer
## Only the HUD text lives here. It is told what happened and shows it.

@onready var label: Label = $Crystals
@onready var goal: Label = $Crystals/Goal

func show_crystals(collected: int, goal_count: int) -> void:
	label.text = "%d / %d" % [collected, goal_count]
	# A number that changes without moving is easy to miss mid-jump.
	var pop := create_tween()
	pop.tween_property(label, "scale", Vector2(1.18, 1.18), 0.05)
	pop.tween_property(label, "scale", Vector2.ONE, 0.12)
Instance HUD under Main. Select Level in Main, open Node → Signals, and
connect crystal_collected(collected, goal) to HUD → show_crystals. The
two integer arguments come from the signal. Do not add another counter in HUD.
Check: F5 begins at 0 / 5. Collect each ground crystal, then jump for the
three elevated ones. Each pickup changes the label once. In this chapter,
reaching the total does not open the gate yet; that connection is next.
7. The gate, export and next steps
Start from the working crystal counter. This chapter adds a visible finish, restart, and a build that can run outside the editor.
Announce completion from the level
Before connecting a completion signal, declare it. Replace scenes/level.gd
with this final version. The new level_complete signal fires when the count
reaches the total; the level still does not decide how the gate moves.
extends Node3D
## The level counts its direct-child collectibles and announces progress.

signal crystal_collected(collected: int, goal: int)
signal level_complete

var total_crystals: int = 5
var collected := 0

func _ready() -> void:
	# Show the count from the start, so changing total_crystals changes the HUD.
	call_deferred("_emit_initial")

	# A designer who drops another crystal into the scene should not have to
	# remember this number: say so instead of never winning.
	var placed := 0

	for child in get_children():
		if child is Collectible:
			placed += 1
			child.collected.connect(_on_collectible_collected)

	total_crystals = placed

func _emit_initial() -> void:
	crystal_collected.emit(0, total_crystals)

func _on_collectible_collected() -> void:
	collected += 1
	crystal_collected.emit(collected, total_crystals)

	if collected == total_crystals:
		level_complete.emit()
Make a reusable gate
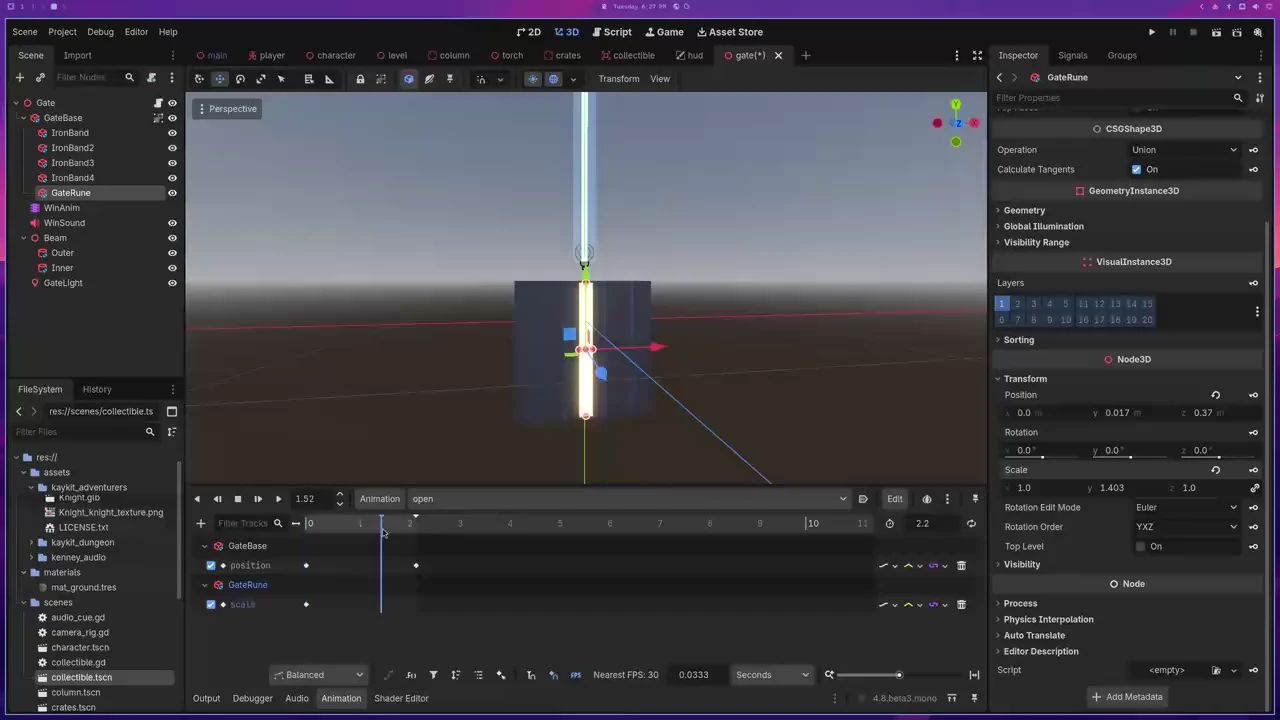
Create scenes/gate.tscn with a Node3D root named Gate. Put the gate's
moving box under it as GateBase. Keep the root at the opening's origin;
the moving box is local to it. Replace the temporary gate in Level with an
instance of this scene positioned at (0, 0, -19.35).
Build this tree before adding the script:
Gate (Node3D)
├── GateBase (CSGBox3D, collision on)
│   ├── IronBand / more bands as desired
│   └── GateRune (CSGBox3D, emissive material)
├── WinAnim (AnimationPlayer)
├── WinSound (AudioStreamPlayer3D)
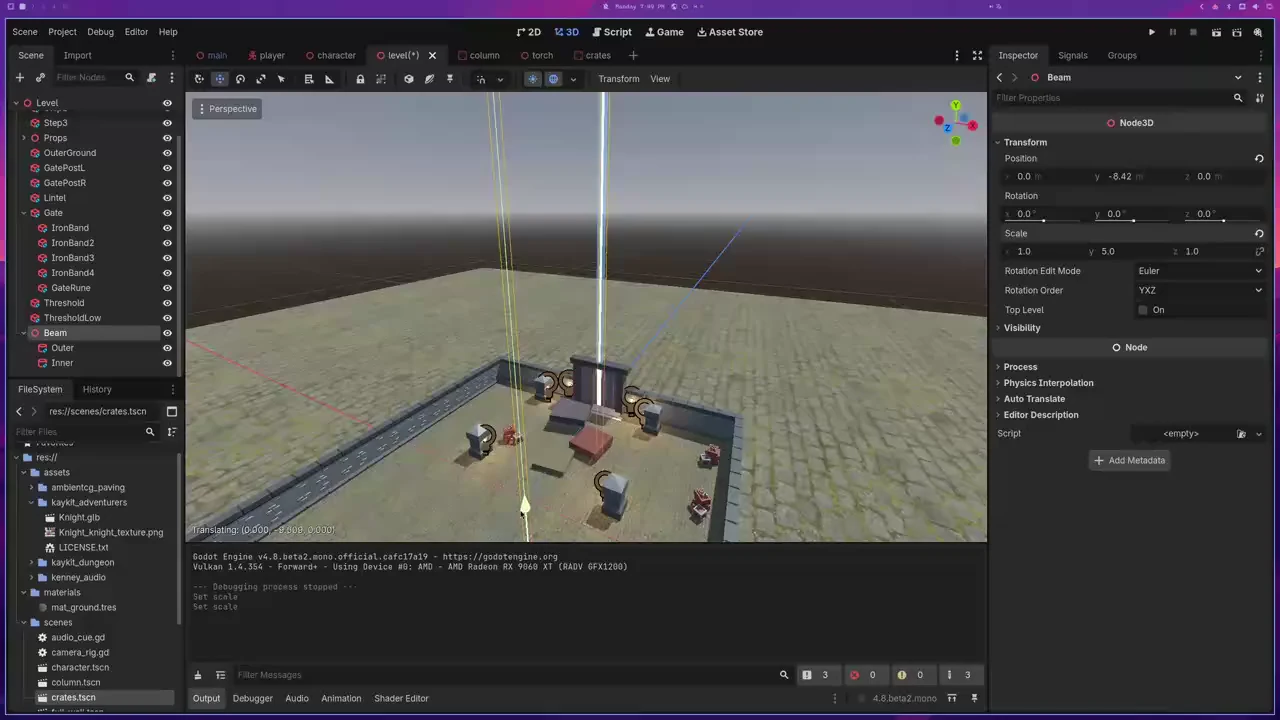
├── Beam (Node3D)
│   ├── Outer (CSGCylinder3D)
│   └── Inner (CSGCylinder3D)
└── GateLight (OmniLight3D)
GateBase has size (6.4, 6.4, 0.5) and local position (0, 3.25, 0).
Use assets/kenney_audio/win.ogg on WinSound, volume -2 dB, max distance
40. Place GateLight at (0, 3, 0), with energy 0.8 and range 16.
A narrow pair of emissive cylinders makes the beam. Keep the GateBase,
GateRune and Beam as separate nodes so their tracks have clear targets.
Author the open animation
Select WinAnim. Leave its root at its parent Gate, create an animation named
open with length 2.2 seconds, and add these property tracks. Key the
initial values before changing them. A RESET animation should restore those
initial values when you return to editing.
| Track, relative to Gate | Start | End | End time |
|---|---|---|---|
GateBase:position |
(0, 3.25, 0) |
(0, -3.4, 0) |
2.2 |
GateBase/GateRune:scale |
(1, 1.4034294, 1) |
(2, 1.442, 1) |
1.01 |
Beam:scale |
(1, 5, 1) |
(0.05, 5, 0.05) |
1.6 |
GateLight:light_energy |
0.8 |
7.0 |
1.2 |
Beam:visible |
true |
false |
1.72 |
For Beam visibility use a discrete track, keeping it visible through 1.68
seconds and hiding it at 1.72. Preview the complete animation in the editor.
The moving collision belongs to GateBase, so the opening clears as the box
lowers. Do not animate the entire Gate root or its fixed light and frame.
Attach res://scenes/gate.gd to Gate:
class_name Gate
extends Node3D
## The gate knows nothing about crystals or the HUD. It only knows
## how to open itself: play its own sound and play its own animation.

@onready var win_anim: AnimationPlayer = $WinAnim
@onready var win_sound: AudioStreamPlayer3D = $WinSound
@onready var gate_light: OmniLight3D = $GateLight

func open() -> void:
	win_sound.play()
	win_anim.play("open")
The gate knows only how to open itself. In Level's scene, connect the
existing level_complete signal from Level to Gate → open. Save Level.
There is no gate lookup or gate movement code to add to the level script.
Add the win message and restart
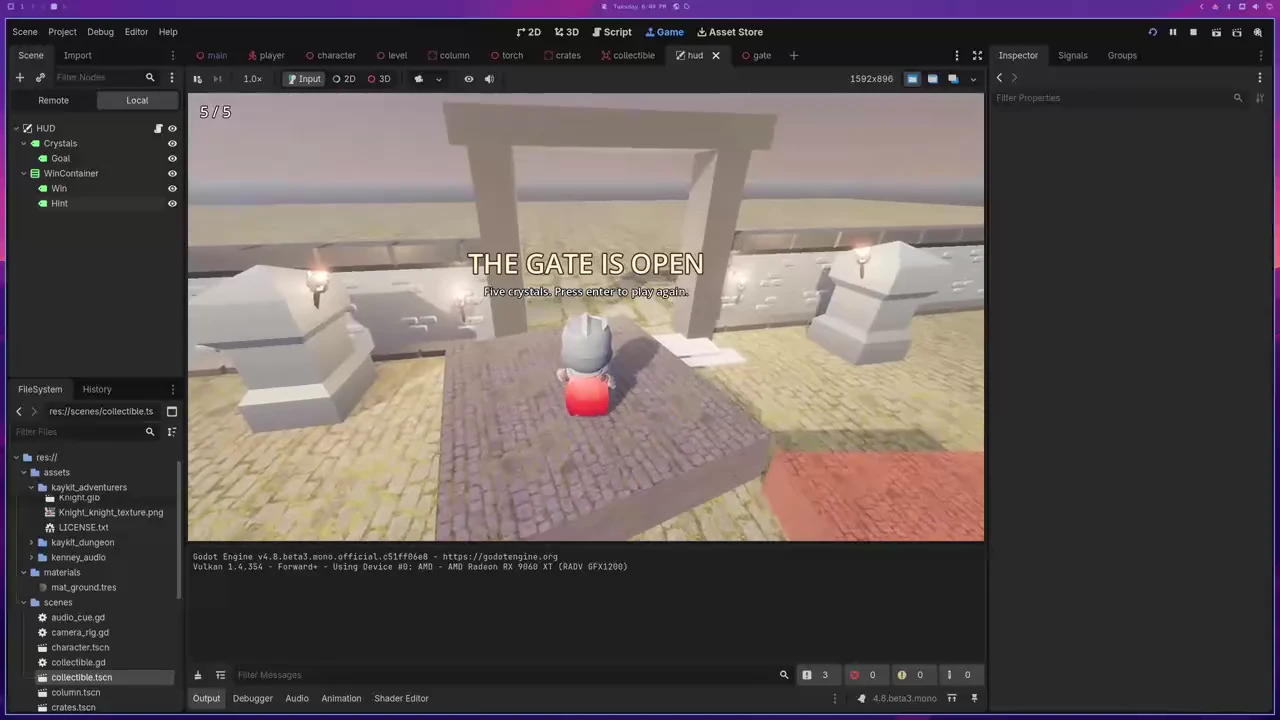
In HUD, add a centered VBoxContainer called WinContainer, with Labels
Win and Hint. Give Win the text THE GATE IS OPEN, font size 54.
Give Hint the text Five crystals. Press enter to play again., font size 22.
Use center anchors and center alignment so the message reads in the middle.
Replace scenes/hud.gd with its final version:
extends CanvasLayer
## Only the HUD text lives here. It is told what happened and shows it.

@onready var label: Label = $Crystals
@onready var goal: Label = $Crystals/Goal
@onready var win : VBoxContainer = $WinContainer

func _ready():
	win.visible = false

func _unhandled_input(event: InputEvent) -> void:
	if win.visible and event.is_action_pressed("ui_accept"):
		get_tree().reload_current_scene()

func show_crystals(collected: int, goal_count: int) -> void:
	label.text = "%d / %d" % [collected, goal_count]
	# A number that changes without moving is easy to miss mid-jump.
	var pop := create_tween()
	pop.tween_property(label, "scale", Vector2(1.18, 1.18), 0.05)
	pop.tween_property(label, "scale", Vector2.ONE, 0.12)

func show_win() -> void:
	goal.visible = false
	win.visible = true
Back in Main, connect Level → level_complete to HUD → show_win. That is separate from Level's connection to Gate.open. One completion event opens the gate and changes the display. The recorded win happens when all crystals are collected; it does not require a separate exit-area trigger.
Check: collect all five crystals. The gate lowers, the sound and light
change play, the count reaches its total and the win message appears. Press
Enter; ui_accept is the built-in action, and the main scene restarts with all
five crystals. Test the whole loop before exporting.
Export the game
Open Project → Export, add a Linux preset and install export templates
matching your exact engine build if requested. Select main.tscn as the main
scene in Project Settings. Choose a writable export path outside the source
asset folders, then Export Project.
The recorded preset uses a separate PCK (Embed PCK off). Keep the executable
and its .pck file together when you share the build. You can choose Embed PCK
if you want one executable instead. That is an export setting, not a new script.
Launch the exported executable directly. Test movement, camera, the three jumps, five pickups, gate opening and Enter to restart. An export preset existing is not proof that the executable runs.
Final scene map
Main
├── WorldEnvironment
├── Sun / Fill
├── Player (player.tscn instance)
│   ├── CollisionShape3D
│   ├── Visual
│   │   └── Character → Knight → AnimationPlayer
│   ├── JumpSound / LandSound
│   ├── AnimationTree
│   └── CameraArm → Camera3D (added to the instance in Main)
├── Level (level.tscn instance)
│   ├── Ground / steps / Props / gate frame
│   ├── Gate → GateBase / WinAnim / WinSound / Beam / GateLight
│   └── five Collectible instances
└── HUD → Crystals → Goal, plus WinContainer → Win / Hint
Keep the signal connections in their owning scenes: Player's sound connections in Player, Level-to-Gate in Level, and Level-to-HUD in Main. If a method cannot be selected, save the script that declares it before opening the connection dialog again.
If your result differs
- Player falls forever: verify the floor/body shapes and matching collision layers. In chapter 5, check Use Collision on the CSG ground and steps.
- Camera-arm path error: run Main. The recorded camera is added to its Player instance; a standalone player scene does not contain those children.
- Knight moves but stops animating: reimport the needed clips with Linear loop mode, then check AnimationTree's two node paths and Active state.
- Count stays at zero: keep Collectible instances directly under Level and connect Level's count signal to HUD.show_crystals in Main.
- Five crystals but no gate or message: verify both completion connections,
and that Gate's animation is named exactly
open. HUD.show_win is a separate listener from Gate.open.
Assets and next steps
The starter includes KayKit Adventurers, KayKit Dungeon Remastered, ambientCG PavingStones131 and the course's selected Kenney sounds. Keep the included licenses with redistributed assets. No asset is generated by this guide.
The complete free lesson is in the video and the steps above. If you want the ready-to-open start and chapter-end projects, use the existing supporter posts in the video description. For another learning route, browse the course catalog or read the AnimationTree guide.